Sitting properly during long gaming sessions comes down to four things: a supported lower back, feet flat on the floor, a screen at roughly eye level, and regular movement breaks. Get those right and a four-hour session stops feeling like a workout for your spine. Set aside about 20 minutes to dial in your setup the first time.
Most discomfort I see in gaming spaces comes from a single problem. A player bought a good chair, then never adjusted the seat height, the lumbar, or the armrests, and spent six months sliding forward onto the front edge of the seat with their feet dangling. A chair is a tool, not a posture. It only works when you set it up for your body.
This guide walks through the order of operations, because sequence matters. If you raise the monitor after the chair, you will undo part of the work. Read the eight steps top to bottom the first time, then use them as a checklist whenever you move desks or change chairs.
Table of Contents
- What You Need
- Step-by-Step
- Step 1: Set Your Chair and Pelvis
- Step 2: Place Your Feet Flat
- Step 3: Keep Your Lower Back Supported
- Step 4: Relax Your Shoulders and Arms
- Step 5: Bring the Screen to Eye Level
- Step 6: Position Your Keyboard, Mouse, and Controller
- Step 7: Use a Neutral Neck and Face Position
- Step 8: Change Position and Take Breaks
- Common Mistakes
- Frequently Asked Questions
- What is the 90-90-90 rule for sitting?
- Is it better to sit or stand while gaming?
- How can I sit for long hours without getting back pain?
- How do people with ADHD sit in chairs?
- Should I lock my gaming chair’s recline?
- When should I see a doctor about gaming-related pain?
- Conclusion
What You Need
None of this requires expensive gear. You need a few things in place before you start adjusting how to sit properly during long gaming sessions, and most of them you already own.
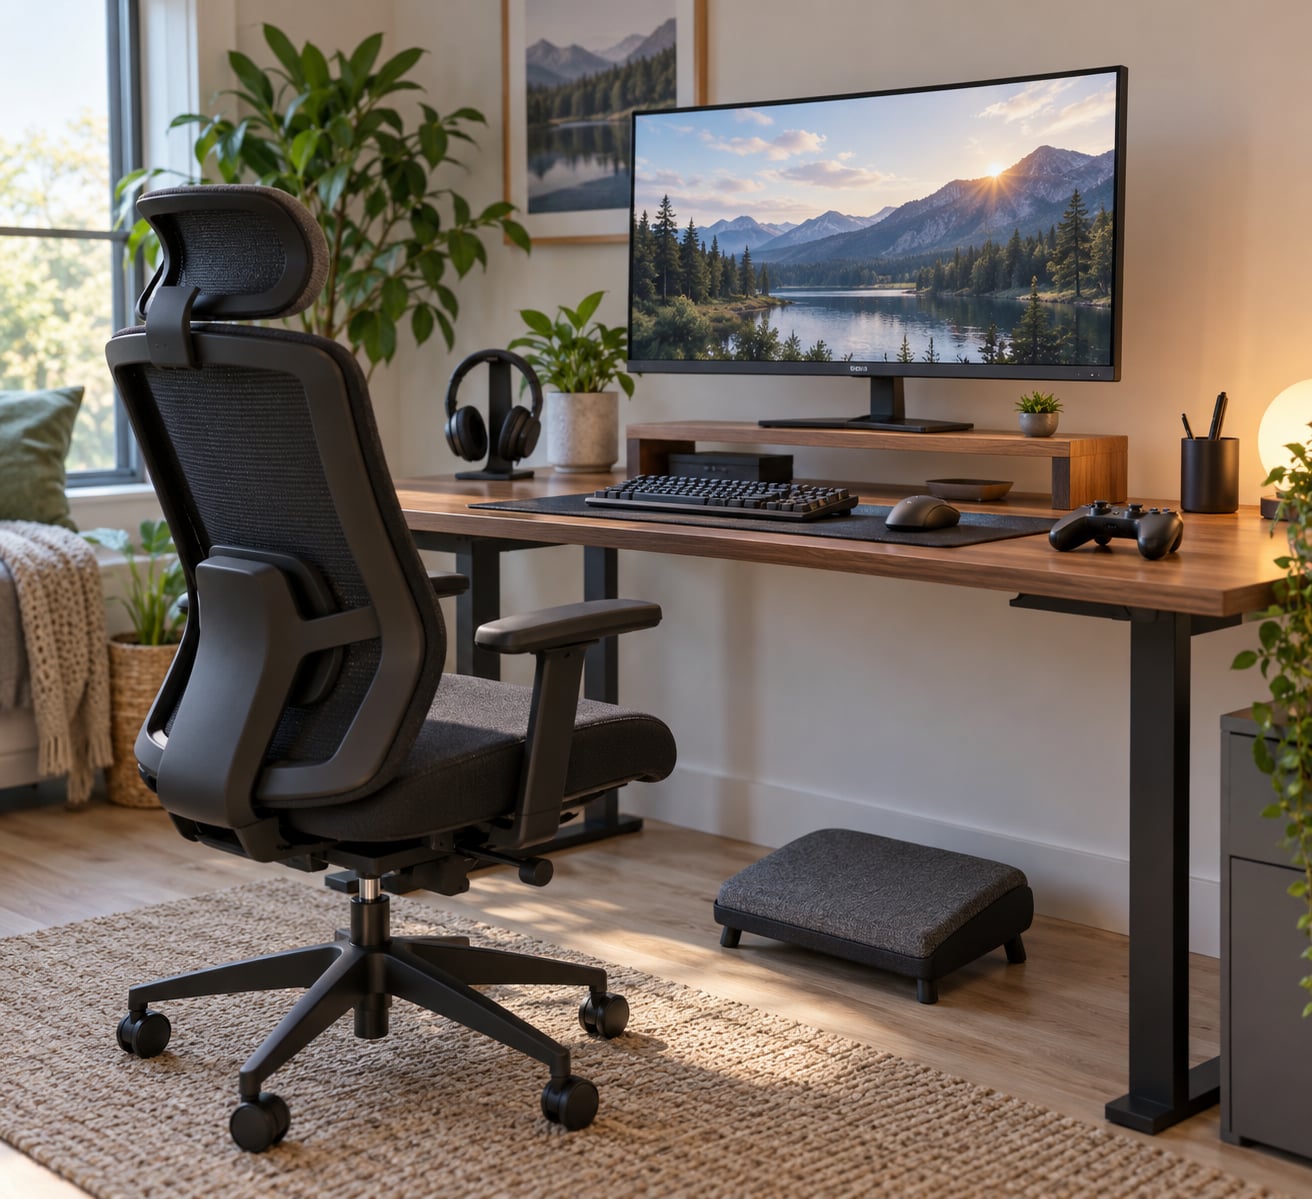
- A supportive seat with height adjustment. A gaming chair works, and so does a decent office chair. The height lever matters far more than the brand badge.
- A desk you can sit close to. If you have to reach forward to type, no chair adjustment will save your shoulders.
- A screen you can raise. A monitor riser, a stack of sturdy books, or a wall shelf all do the same job.
- A keyboard and mouse you can reach without leaning. A full-size board forces your right arm outward if the mouse sits on the same plane.
- A controller if you play that way. It changes your arm position completely, and it gets its own section below.
- Something for your feet. A footrest, a box, or a sturdy stack of books works. Short players often report a footrest as the single change that finally fixed their back pain.
- A break cue. A timer, a phone alarm, or even the pause menu between rounds.
Two measurements help more than any guesswork. Sit against the back of the chair and check that roughly two to three fingers fit between the seat edge and the back of your knee. If you cannot fit them, the seat pan is too deep and it will press behind your legs all evening.
The second measurement is lumbar height. Sit back, and run your hand down your spine until you hit the small dip at the base of your lower back. Whatever is resting there should be your lumbar support. Most setups are adjusted for a torso an inch or two longer than the one using them.
What you do not need is a foot massager, a lumbar wedge you have to wedge in yourself every session, or a new desk before you have adjusted the one you have. Setup order beats gear.
Step-by-Step
Step 1: Set Your Chair and Pelvis
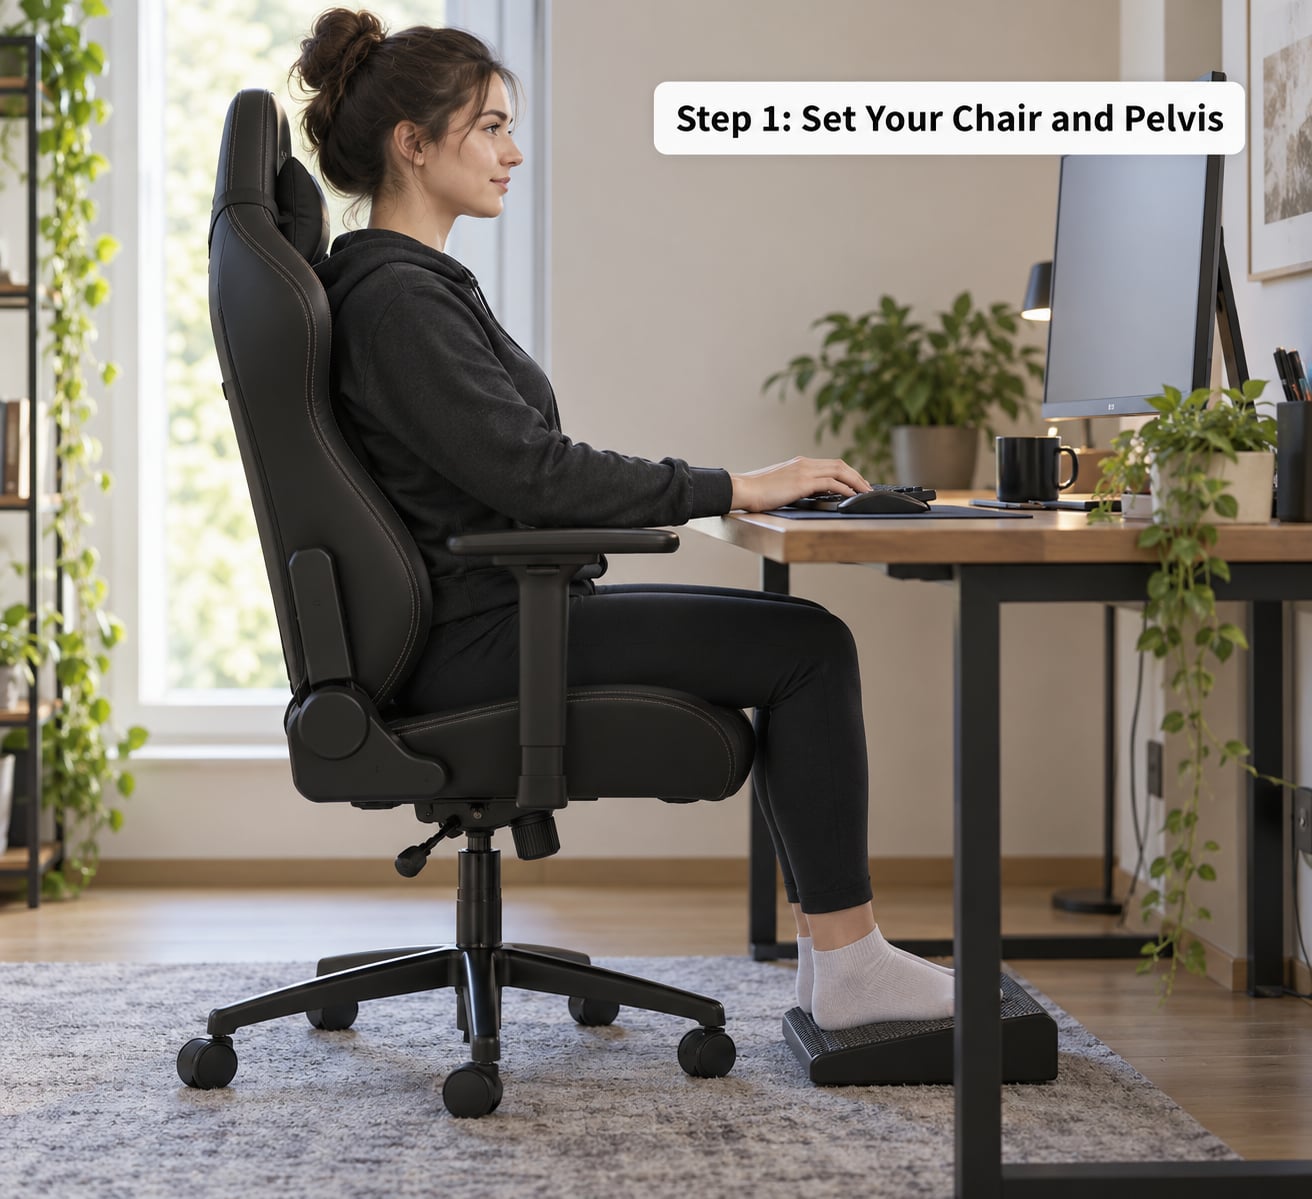
Sit all the way back, using the backrest for what it is there for. Your weight should be on your sitting bones, not on the front edge of the seat, and your pelvis should be roughly neutral rather than tipped far back.
Raise or lower the seat until your hips sit level with, or a fraction higher than, your knees. This is the version of the 90-90-90 rule that matters here: hips at about 90 degrees, knees at about 90 degrees, and feet flat. If your knees end up well above your hips, your weight slides forward and the lower back takes over the load.
You will know this step worked when you can type for 20 minutes without feeling like you need to scoot forward to reach the keys.
Step 2: Place Your Feet Flat
Both feet go on the floor or on a footrest, hip-width apart and pointing slightly outward. Dangling feet push pressure into the underside of your thighs, and that pressure traces straight up into the lower back.
If your desk is too tall for your legs to reach, that is a desk problem, not a body problem. Lower the chair and raise your feet on a footrest, or raise the chair and put something solid under your feet. Players in gaming communities describe a footrest as the one cheap fix that finally cleared their back pain.
Avoid crossing one leg over the other for long stretches. It feels fine for twenty minutes, then it changes which hip you are loading and how you are breathing.
You will know this step worked when you have forgotten your feet are there. That is the goal, and nothing less.
Step 3: Keep Your Lower Back Supported
Your lower back has a natural inward curve called lumbar lordosis, and you want to keep it, not flatten it. The chair’s backrest, a built-in lumbar support, or a small cushion should fill that dip gently.
Dial the lumbar in by height first, then by depth. Too high and it presses under the bottom of your ribs. Too low and it sits in the seat instead of your back, which is the single most common setup error people make, and the one that leaves them thinking the chair is broken.
External lumbar pillows have a habit of sliding down inside the chair, which is why players in gaming forums tend to prefer a built-in support that you can pin at the right height. A folded towel works well in a pinch.
Then set your recline. A slight backward lean, roughly 100 to 110 degrees between your torso and your thighs, takes weight off the discs and your postural muscles. Locking the chair fully upright for hours is its own problem, because you end up holding yourself up with nothing but effort.
You will know this step worked when the chair supports your weight instead of you holding yourself up. There should be no muscle effort in your lower back.
Step 4: Relax Your Shoulders and Arms
Let your shoulders drop away from your ears and sit back slightly. If your shoulders creep up during a tense match, that tension alone is what people end up calling a shoulder problem weeks later.
Set your armrests so your elbows rest at roughly 90 to 110 degrees, close to your body but not pinned in place. You want the armrest to take the weight of your arms so your upper arms do not have to stay lifted for hours. Armrests that cannot get low enough are a real limitation, and adjusting the chair height first usually fixes it.
If you are on a keyboard and mouse, your upper arms should hang more or less straight down. On a controller, your elbows will sit further out from the body, and the armrests need to be a little lower and wider to support that.
You will know this step worked when you can shrug your shoulders and let them drop straight back to where they started.
Step 5: Bring the Screen to Eye Level
Put the top of the display at, or just below, eye level, and place it about an arm’s length away, roughly 20 to 30 inches. The center of the screen should sit slightly below eye level, so your gaze points very slightly downward rather than up.
A monitor that sits too low is the reason so many players end up with neck pain in a setup where everything else is correct. It is also the most common piece of equipment that needs adjusting and never gets adjusted, because a screen on a desk looks fine until you are the one craning down at it for five hours.
For a television across the room, the same idea applies. Raise the center of the picture to eye level, and accept that you will be looking slightly down at the bottom of the screen. If the TV sits on a low media unit, that is the piece to change.
You will know this step worked when you can look at the middle of the screen with your neck straight and your chin level, without tilting.
Step 6: Position Your Keyboard, Mouse, and Controller
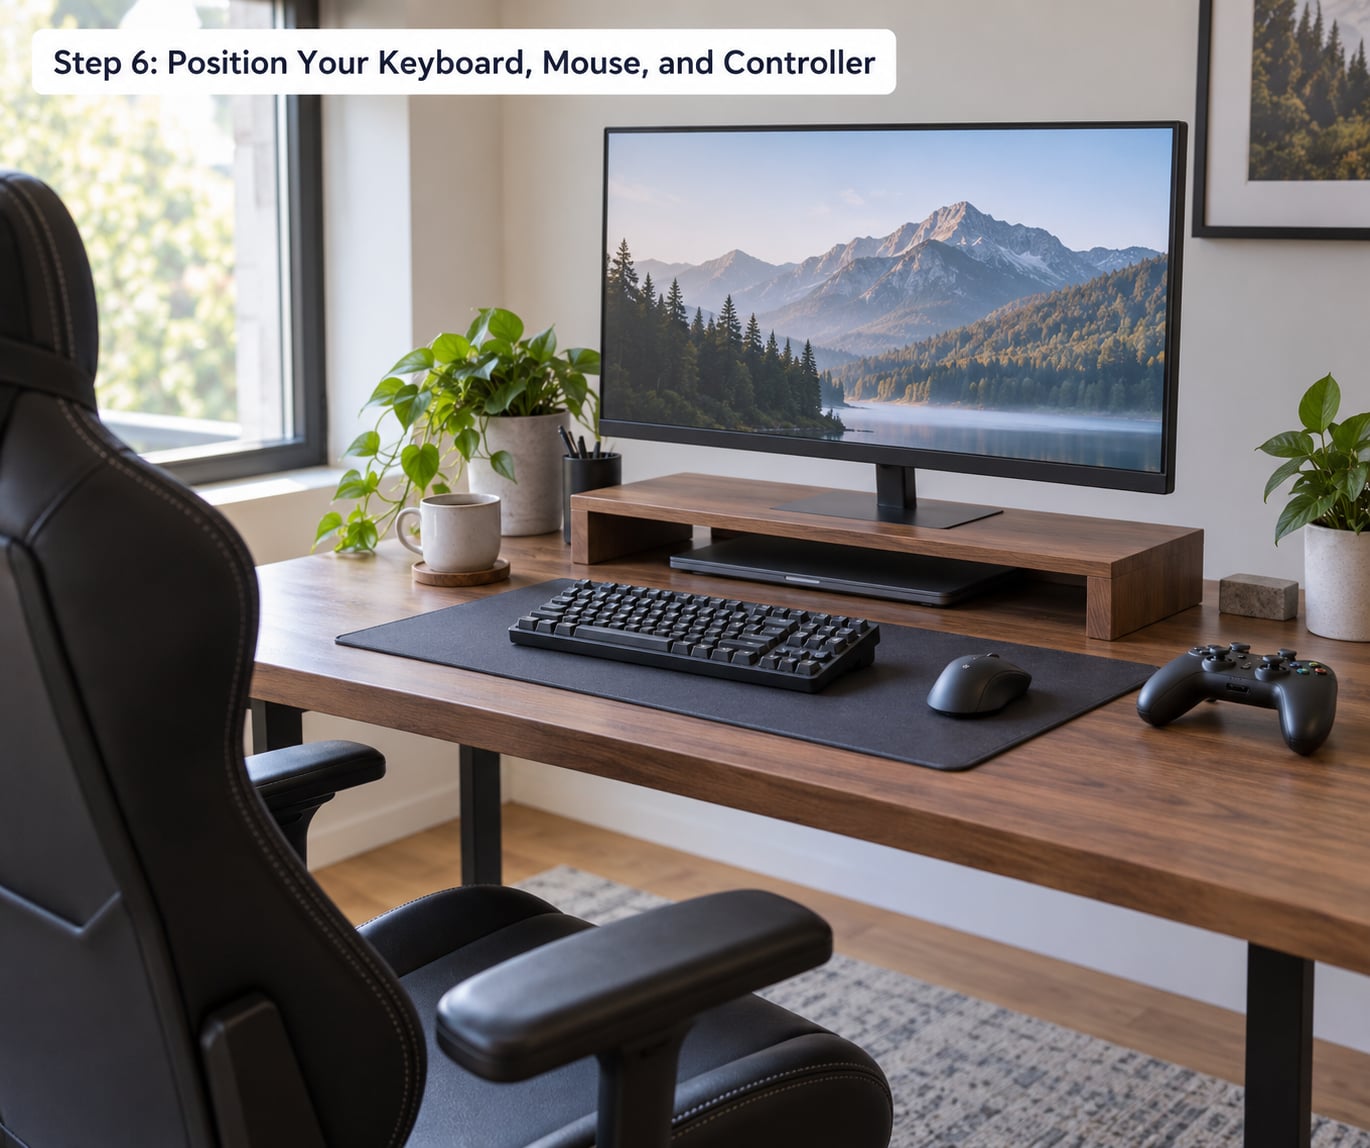
Pull the chair close enough that your forearms rest lightly on the desk edge. If you cannot get that close without reaching, the desk is too deep or too tall for you.
Keep the keyboard centered on your body rather than centered on the desk, especially if you have a numeric pad you never touch. The mouse belongs next to the keyboard, at the same height, close enough that you can move it with your forearm rather than your shoulder.
Watch your wrists. They should stay in a straight line with your forearms, not bent upward, and not pressed hard into the sharp front edge of the desk. That edge is a well-known source of wrist and forearm discomfort, and a soft palm rest or a rolled towel at the edge takes the pressure off.
For controller play, the arms move differently. Hold the controller in your lap or on a lap pad rather than at chest height, keep the elbows close to your body, and stop gripping harder than the game requires. Players who switch between controller and mouse often find they need to reset their armrests and desk clearance each time.
You will know this step worked when you can play a full match without noticing your hands or shoulders at all.
Step 7: Use a Neutral Neck and Face Position
Neutral means your ear, shoulder, and hip sit close to a vertical line. Your chin is level, not tucked hard down and not pushed forward, and your gaze goes straight ahead at the screen rather than down at your hands.
Forward head posture is what people mean by tech neck. The head is heavier than most people expect, and holding it in front of the shoulders puts that weight through the back of the neck continuously. If you catch yourself craning, the fix is almost always a monitor adjustment, not a neck exercise.
Keep your jaw loose. A lot of players clench and hold tension in the jaw and temples during competitive play without noticing, and that shows up later as a headache that has nothing to do with the screen.
Build a small posture check into your routine. Between rounds, between acts, or every time you drink water, run a quick scan: ears over shoulders, shoulders over hips, feet on the floor. Ten seconds is enough, and doing it at a predictable moment is what makes it stick.
You will know this step worked when you catch yourself adjusting into it rather than fighting to hold it.
Step 8: Change Position and Take Breaks
No single position works forever, and the honest answer to how long you can sit in one position is about 30 minutes before you want to change something. Holding one position for hours is what creates the discomfort, not the position itself.
A simple rule is 30 minutes sitting, 5 minutes standing or walking. Another popular one is 20-8-2: 20 minutes seated, 8 minutes standing, 2 minutes moving or stretching. A third, borrowed from eye strain advice, is the 20-20-20: every 20 minutes, look at something about 20 feet away for 20 seconds.
Pick one and attach it to something that already happens. The start of a new match, a loading screen, a commercial, the end of a work shift. Players who tie breaks to game events keep them longer than players who set a phone alarm and try to remember it.
Standing at a sit-stand desk is a useful variation for some players, especially during menus and slower games. It is not a cure-all, and standing still for three hours has its own problems, including swollen feet and a lower back that now works overtime. Alternate rather than replace.
You will know this step worked when breaking does not feel like an interruption. It is part of the session, like saving.
Common Mistakes
Almost every long-session problem comes from one of a handful of habits. Each has a quick fix, and the fix usually takes under a minute.
Perching on the front of the seat. Sliding forward keeps you alert and reactive, and it is the main reason people with good chairs still get lower back pain. Sit back fully, every time you sit down, even if it feels less responsive at first.
Locking the chair straight up. Rigid upright sitting makes you hold your own weight with muscle effort for hours. Let the backrest do its job and allow 100 to 110 degrees of recline.
Watching a screen that is too low. A low monitor is a neck problem disguised as a chair problem. Raise the screen before you change anything else.
Dangling feet. If your heels lift or your toes reach for the floor, your seat is too high. Lower it, or add a foot support.
Rolling the shoulders forward. The mouse ends up in front of the body and the upper back rounds. Bring the mouse back in line with the keyboard.
Leaning on one armrest. Asymmetric leaning is a quiet culprit behind one-sided shoulder and neck complaints, because the whole torso tilts toward one hip. Sit centered, both armrests doing equal work.
Pressing the desk edge into the wrists. Keep the wrists straight and lift the contact point with a palm rest or a rolled towel.
Not moving at all. Even a perfect setup fails against four motionless hours. The breaks are not optional, they are the part of the posture plan that does the most work.
A couple of extra habits go a long way. Keep water and snacks on the side that does not force a twist, and set your keyboard angle flat or slightly negative rather than tilted forward, which pushes the wrists into extension. If you play on a controller, add a lap pad and let your elbows rest against your ribs, since holding the arms out in front of you for a whole match is its own shoulder exercise.
One last note. New setups often feel strange for a few days, especially if your old posture was baked in over years. Mild muscle soreness in the first week is common and usually settles. Sharp pain, numbness, tingling, or pain that persists past a couple of weeks is a different conversation, and worth raising with a doctor or a physical therapist rather than adjusting the chair again.
Frequently Asked Questions
What is the 90-90-90 rule for sitting?
It means your hips, knees, and ankles each sit at roughly 90 degrees. For gaming, the practical version is hips level with or slightly above the knees, feet flat on the floor or a footrest, and forearms close to horizontal. Adjust the chair height first, because almost everything else depends on where the seat sits relative to the desk.
Is it better to sit or stand while gaming?
For long sessions, alternating works better than either one. Standing is useful during menus, queues, and slower games, and sitting is better for precision aiming and fine mouse work. Many players use a 20-8-2 split: 20 minutes seated, 8 standing, 2 moving. Standing all day is not a fix either, since it shifts the strain to the lower back and feet.
How can I sit for long hours without getting back pain?
You cannot sit in one position for long hours comfortably, so the answer is to change position often. Support your lower back, keep both feet flat, set the screen at eye level, and get up or walk every 30 to 60 minutes. A supportive setup reduces the strain during each stretch of sitting, and the breaks stop the strain from accumulating.
How do people with ADHD sit in chairs?
Many players with ADHD prefer setups that allow movement rather than forcing stillness. A chair that rocks or reclines freely, a sit-stand desk, or even a floor cushion between matches can help. Keep the screen high enough that you are not tempted to curl forward, and use short frequent breaks tied to match ends instead of one long break. If focus is the real issue, a therapist can help with that side of it.
Should I lock my gaming chair’s recline?
Usually no. A slight recline of about 100 to 110 degrees between your torso and thighs is comfortable for long sessions and takes pressure off the discs of your lower back. Locking the chair rigidly upright makes your postural muscles work continuously with no help from the backrest, which is tiring after an hour. Lock it only if you catch yourself sliding forward.
When should I see a doctor about gaming-related pain?
See a doctor or physical therapist if you have numbness, tingling, sharp or shooting pain, pain that wakes you at night, or discomfort that does not improve after a couple of weeks of setup changes and regular breaks. Weakness in a hand or arm also deserves a prompt look. Desk adjustments handle ordinary muscle fatigue, but nerve and disc symptoms need a professional assessment.
Conclusion
If you change only four things this week, make them these: support your lower back so the natural curve stays, put both feet flat on the floor or a footrest, raise the screen until the middle sits slightly below eye level, and let the chair recline a little instead of locking it upright.
Then add the fifth, which is the one that actually protects you over a season. Get up, move, or change position every 30 to 60 minutes, and tie it to something in the game so it survives a busy week.
Start with the chair and the monitor before your next long session. Everything else on this list is a five-minute adjustment once those two are right, and you will feel the difference in the first hour.