The best controller settings for beginners in competitive shooters come down to four things: a sensitivity you can hold steady, a response curve that does not punish small thumb movements, deadzones that stop drift without eating your inputs, and aim assist turned down just enough that you still learn to aim. Copy a pro’s 1.8 horizontal without the two hundred hours behind it and your crosshair will fly past every target.
Here is the version I would hand a friend on day one, expressed separately for Xbox, PlayStation and PC, plus the ten-minute test that tells you whether a change actually helped. The whole setup takes about fifteen minutes.
Table of Contents
- What You Need
- Step-by-Step
- Choose the Right Control Style
- Set Aim and Response Options on Xbox
- Set Aim and Response Options on PlayStation
- Set PC Dead Zones and Sensitivity
- Configure Buttons, Triggers, and Vibration
- Test and Fine-Tune the Setup
- Beginner Mistakes to Skip
- Common Controller Settings Mistakes and How to Fix Them
- Frequently Asked Questions
- What sensitivity should a beginner use in a competitive shooter?
- Should beginners use aim assist on or off?
- What is a good controller dead zone for beginners?
- Is linear or exponential aim better for new players?
- Should I use the same controller settings for every competitive shooter?
- How long should I test new controller settings before changing them?
- Conclusion
What You Need
Before touching a single slider, know three things: which controller you are holding, which game and mode you actually play, and how long you can give the test afterwards.
- Your controller. The Xbox Series X|S controller exposes aim response curves, inner and outer deadzones and per-stick multipliers at the system level. The DualSense on PS5 hides most of that inside each game. On PC your options depend on whether the game reads raw input or goes through Steam Input.
- The game and mode. Sensitivity and aim assist values do not transfer cleanly between shooters. A battle royale with long sightlines needs a different feel from a fast arena shooter, so tune for the mode you queue for, not for the genre in general.
- Fifteen minutes to set it, ten minutes to test it. The setup is short. The testing is the part beginners skip, and it is the part that tells you anything.
If you have a thumbstick extender fitted, take it off before you tune anything. Hardware changes how a sensitivity feels, so change one variable at a time, hardware included.
Step-by-Step
Work through this in order. Each step only makes sense once the one above it is settled.
Choose the Right Control Style
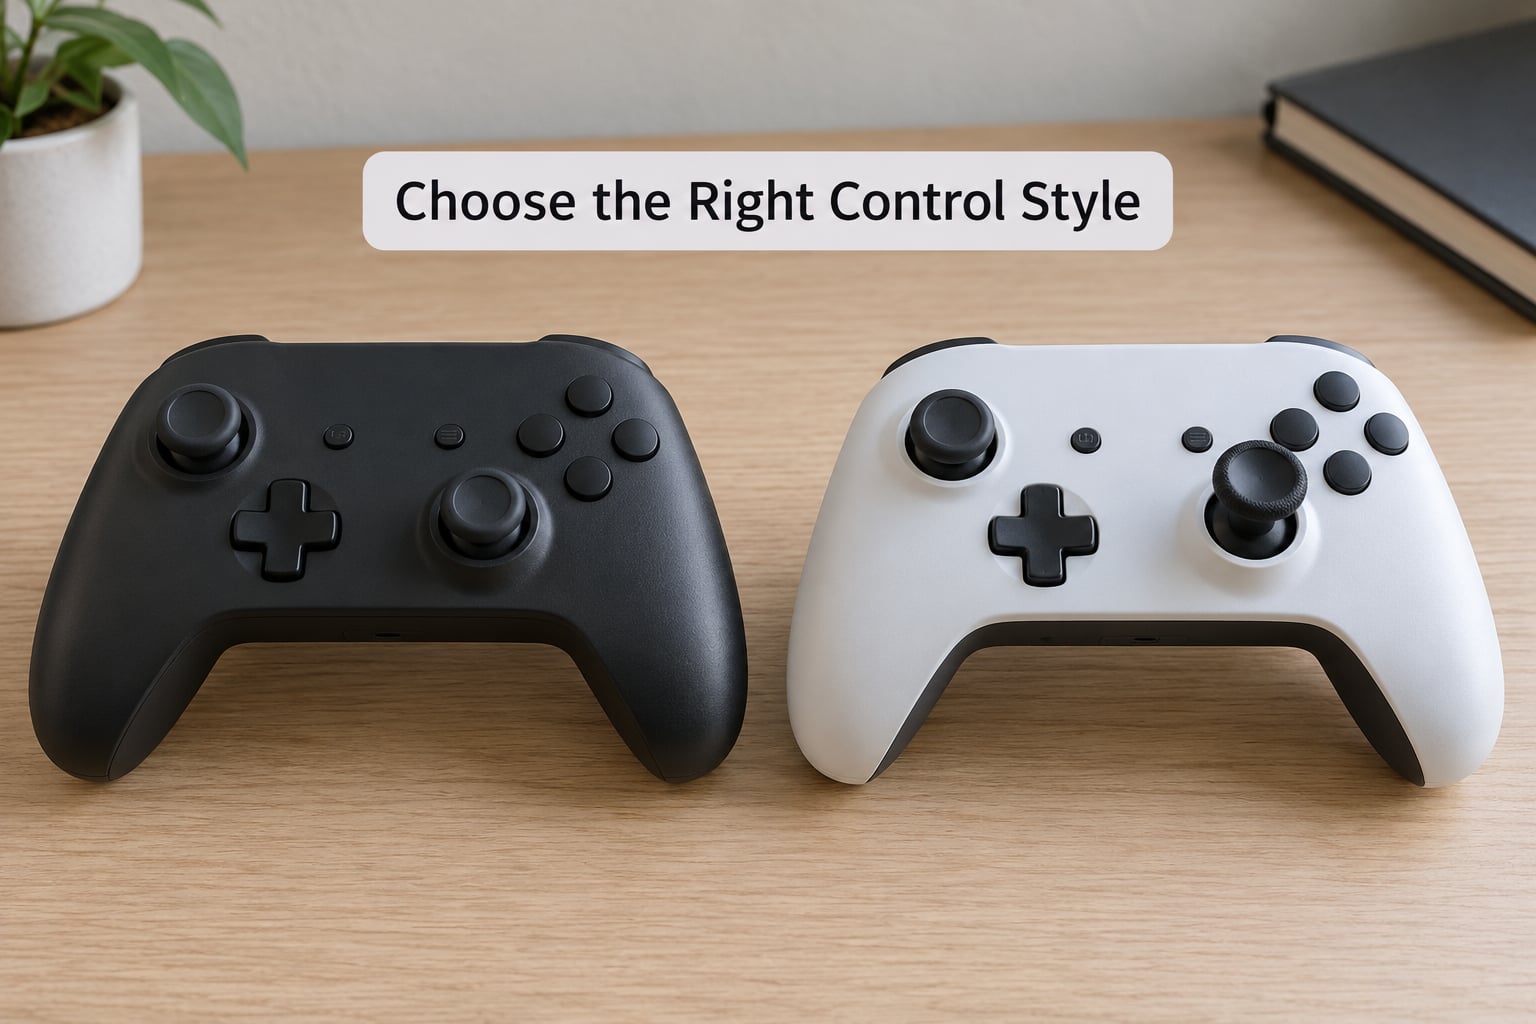
Stick layout matters more than any number on the settings screen. A symmetrical controller has identical left and right sticks; an asymmetrical one pairs a short, tall left stick with a shorter, deeper dished right stick.
For the best controller settings for beginners in competitive shooters, the asymmetrical layout is usually the easier switch, and the reason is about the right stick, not the left. The dished shape stops your thumb sliding off at the exact moment you are correcting a shot, and the shorter travel means you reach the end sooner, so a moderate sensitivity gets you a full turn before the stick bottoms out. If your thumb slips on a flat symmetrical stick, the crosshair keeps moving after you thought you had stopped. That reads as bad aim when it is really grip.
The short left stick is worth keeping too. It gives you more travel for slow walking and strafing adjustments, which is where new players lose fights they should have won.
Set Aim and Response Options on Xbox
On Xbox Series X|S, press the Menu button (three horizontal lines) and go to Options, then Controller Layout, then Control Layout, then Gamepad. Click the small gear icon beside the stick image to open the full slider list. Labels shift slightly between controller models and system updates, so look for the gear rather than memorising the wording.
A sensible beginner starting point:
| Setting | Beginner value | Why |
|---|---|---|
| Aim response curve | Dynamic or classic exponential | Slower near centre, faster near the edge |
| Left stick deadzone | Inner 0.03, outer 1.00 | Zero is fine, there is no drift to fix |
| Right stick deadzone | Inner 0.05, outer 1.00 | Slightly higher, this stick drifts more |
| Thumbstick output curve | Gradual | A steadier ramp for small corrections |
| Left stick sensitivity | 1.10 to 1.20 | Beginner range |
| Right stick sensitivity | 1.10 to 1.20 | Beginner range |
On PC and Steam, beginners sit noticeably lower than the players they are watching. Forum threads on r/apexuniversity and r/apexlegends repeatedly put beginners around a 1.1 to 1.2 look multiplier while pros run 1.5 to 1.8, and the same threads converge on the same Xbox baseline: deadzone 3, outer threshold 2 to 3, yaw around 250, pitch around 200 to 230, extra yaw 500, and an ADS multiplier near 120 on a 1000 scale.
Vertical goes below horizontal. Players describe setting vertical at roughly 75 to 80 percent of horizontal, which lets you level a shot without pushing the camera up past the head. The convention is debated and plenty of top players run matched values, so treat it as a starting point rather than a rule.
Set Aim and Response Options on PlayStation
On PS5 the system menu offers far less than Xbox. System-level stick options live under Settings, then Accessibility, then Controller Settings, and most of what matters is set inside the game itself.
Open your game’s settings and look for Aim Response Curve, Aim Sensitivity and Deadzones. Apex Legends on console, Delta Force and the Call of Duty entries all expose these under Controller or Gameplay settings, with the same three core ideas underneath:
- Response curve. Exponential or dynamic for beginners. Linear is fine too, and plenty of players finish their whole career on it, but it is the least forgiving of a drifting thumb.
- Inner deadzone. Start at 5 to 10 percent. A large deadzone is a common beginner mistake: it does not reduce drift you do not have, it just makes the first part of every flick do nothing.
- Per-weapon opt-in scope sensitivity. Turn it off while learning. One setting for every weapon keeps your muscle memory consistent.
If you use a DualSense Edge, map the two back buttons in the PS5 Accessories app and put sprint and crouch there. Bumping them with a thumb keeps your aim stick still, which is where new players lose their biggest advantage.
Set PC Dead Zones and Sensitivity
On PC you have two layers, and beginners usually fight both at once. The game exposes its own sensitivity and aim response curve. On top of that, Steam Input applies its own deadzones if the game is running through it.
In Steam Input, right-click the game, choose Manage, then Controller. Under Deadzones you get a value and a deadzone type per stick; the radial option behaves differently from the default, and both stick deadzones are set independently. If your aim feels slow and you cannot explain why, a Steam Input deadzone of 0.28 on a game that already has its own is the usual culprit.
For a comfortable starting sensitivity in a linear-input game, measure instead of guessing. Sit with your thumb centred, turn your full wrist, and note how far the camera rotates. That is your centimetres per 360. Too fast means your wrist is outrunning the crosshair; too slow means you need arm movement, which no console player should be doing in a duel.
Linear and exponential are not quality levels. Exponential gives fine control near the centre and speed at the edges, which suits short-range fights. Linear gives the same ratio everywhere and is easier to predict, which suits long-range tracking and beginners who like knowing exactly how far the stick moves the camera.
Configure Buttons, Triggers, and Vibration
Build a layout with the actions you actually use in one row, and put everything else underneath. On a shooter, slide, crouch, jump, ping and weapon swap are the actions worth rearranging.
Slide and jump are the classic choices for remapping. A player who has to move their hand off the face buttons to jump loses a beat every time they push forward, and in a close-range fight that beat is the whole exchange.
Triggers: if your right trigger feels light or rattly, check for a worn stick and a dirty trigger well before blaming your settings. Vibration is worth keeping on at a moderate level because it carries positional cues in several shooters, but drop it to low if it makes your hand tense during long sessions. Tension is a real aiming problem and it never shows up in a settings screenshot.
Test and Fine-Tune the Setup
Run one match in the practice range or bot mode and watch for four specific failures. Each one points at exactly one setting.
- Your character moves when you are not touching the stick. That is drift or a deadzone problem. Check the stick, then the inner deadzone.
- You overshoot every flick shot. Your horizontal sensitivity is too high or your curve is too aggressive at the edge. Drop horizontal by about 10 percent.
- You cannot aim at head height without pushing the camera up. Vertical is too high. Drop it another 10 percent.
- You miss first-shot hip fire but hit fine when scoped. Your aim assist is doing too much of the hip work. Turn it down a step or shorten the time window it stays on.
Change one variable, then play at least three full matches before judging it. The ten minutes you spent tuning are worth nothing if you evaluate them on a single bad game.
Beginner Mistakes to Skip
Copying extreme pro sensitivity without training in it is the big one, and it is the reason so many new players quit. Changing several settings in one session is the second. Third is mixing deadzone values and response curves you copied from different players until nothing in the setup has a reason behind it. Ignore the hardware difference, and comfort last.
Common Controller Settings Mistakes and How to Fix Them
These are the patterns that come up again and again in competitive shooter communities, and each has a straightforward fix.
| Mistake | Why it hurts | Fix |
|---|---|---|
| Copying a 1.5 to 1.8 pro look sensitivity | The crosshair travels further than your thumb can correct | Start at 1.1 to 1.2 and raise it only after ranked improves |
| Maxing inner deadzone to 10 or higher | The start of every flick is swallowed | 5 to 10 percent, and only if the stick physically drifts |
| Running 100 percent aim assist on every weapon | Hip fire gets a crutch, close fights stay easy, long fights do not improve | 80 to 100 percent on close-range guns, lower on snipers |
| Changing three sliders every session | You never learn what any of them do | One change, three matches, then judge |
| Rebuilding settings after every patch | Aim assist tweaks are routine and the change is small | Keep your curve and deadzones, adjust strength only |
| Skipping aim training entirely | Sessions only teach positioning, not aim | Ten minutes of range work at the same sensitivity you queue with |
Two habits hold up over a season. Train at the sensitivity you play at, because aim built at one value transfers badly to another. And accept that this is preference: the community splits straight down the middle on whether deadzones should be zero, with a strong zero-deadzone camp that adjusts the aim response slider underneath instead, and both sides produce good players.
Frequently Asked Questions
What sensitivity should a beginner use in a competitive shooter?
Most beginners do best between 1.1 and 1.2 on a console look multiplier, roughly 5 to 7 percent of the range pros typically play at. Set vertical a little lower, around 75 to 80 percent of horizontal, so you can level a shot without pushing past the head. Stay on one value long enough to build muscle memory before touching it again.
Should beginners use aim assist on or off?
Use it, just not at maximum on everything. Aim assist applies magnetism and rotation slowdown toward a target, and the strength slider controls how hard it pulls your crosshair. Beginners benefit most from aim assist on close-range weapons where fights last a split second, and from turning it down on snipers and other long-range guns.
What is a good controller dead zone for beginners?
For most controllers, an inner dead zone of 5 to 10 percent is plenty, with the outer dead zone left at its default of 1.00. The inner dead zone ignores tiny resting movements so they do not register as input. Raising it far beyond that does not improve aim, it just deletes the first part of every flick shot.
Is linear or exponential aim better for new players?
Neither is strictly better, and both work. Exponential curves are slower near the centre and faster at the edge, which gives fine control on close targets. Linear keeps the same ratio everywhere and is easier to predict for long tracking. Start on the default exponential or dynamic curve your game offers, then switch if it fights you.
Should I use the same controller settings for every competitive shooter?
Not exactly. Sensitivity values do not transfer cleanly because every game applies its own scaling, and aim assist strength differs between titles. Keep your stick layout, response curve and deadzones consistent, then re-tune sensitivity and aim assist per game. Muscular habits carry across, raw numbers do not.
How long should I test new controller settings before changing them?
Give any change at least three full matches, ideally a few sessions, before you judge it. Settings changes feel wrong for the first few games because your hands are relearning, and that discomfort is not evidence the values are bad. One change at a time, three matches to evaluate it, then decide.
Conclusion
The best controller settings for beginners in competitive shooters are not the ones on a pro’s screenshot. They are the ones you can repeat for a full session without thinking about them. Start with the platform defaults above: a conservative look sensitivity around 1.1 to 1.2, vertical at roughly 75 to 80 percent of that, an exponential or dynamic curve, a low inner dead zone and one aim assist strength for every gun. Then play ten minutes in the bot range and change only the one setting the failure points to.
Repeat that until movement and aim feel consistent rather than fast. Settings are not what make you good, but the wrong ones can quietly stop practice from ever paying off.